The Sun Java Wireless Toolkit (formerly known as J2ME Wireless Toolkit) is a set of tools for creating Java applications that run on devices compliant with the Java Technology for the Wireless Industry (JTWI, JSR 185) specification and the Mobile Service Architecture (MSA, JSR 248) specification. It consists of build tools, utilities, and a device emulator. The application, a MIDlet, was designed for the Mobile Information Device Profile, one of the Java ME specifications. here we write and deploy a normal servlet and hook it up with a MIDlet to run the same app in a mobile device. we can test it using the emulator provided in the toolkit.
First prepare for a normal web app deployment using Tomcat 4.1 or above. the folowing code just counts the number of hits and displays it to the user.
First prepare for a normal web app deployment using Tomcat 4.1 or above. the folowing code just counts the number of hits and displays it to the user.
import javax.servlet.http.*;
import javax.servlet.*;
import java.io.*;

public class HitServlet extends HttpServlet {
private int mCount;

public void doGet(HttpServletRequest request,
HttpServletResponse response)
throws ServletException, IOException {
String message = "Hits: " + ++mCount;

response.setContentType("text/plain");
response.setContentLength(message.length());
PrintWriter out = response.getWriter();
out.println(message);
}
}
Compile and deploy the servlet using configurations in the web.xml as its done usually.Test the application by providing the URL specified in the web.xml.now we'l connect the servlet with the MIDlet.Install the wireless Toolkit and create a new project
HelloSuite. The following shows the Toolkit interface.The window will show where you have to store the source code files after creating the project.
Savethe below code as
Savethe below code as
HitMIDlet.java inside the apps/HelloSuite/src directory underneath the Sun Java Wireless Toolkit root directory.import java.io.*;
import javax.microedition.io.*;
import javax.microedition.lcdui.*;
import javax.microedition.midlet.*;
public class HitMIDlet
extends MIDlet
implements CommandListener {
private Display mDisplay;
private Form mMainForm;
private StringItem mMessageItem;
private Command mExitCommand, mConnectCommand;
public HitMIDlet() {
mMainForm = new Form("HitMIDlet");
mMessageItem = new StringItem(null, "");
mExitCommand = new Command("Exit", Command.EXIT, 0);
mConnectCommand = new Command("Connect",
Command.SCREEN, 0);
mMainForm.append(mMessageItem);
mMainForm.addCommand(mExitCommand);
mMainForm.addCommand(mConnectCommand);
mMainForm.setCommandListener(this);
}
public void startApp() {
mDisplay = Display.getDisplay(this);
mDisplay.setCurrent(mMainForm);
}
public void pauseApp() {}
public void destroyApp(boolean unconditional) {}
public void commandAction(Command c, Displayable s) {
if (c == mExitCommand)
notifyDestroyed();
else if (c == mConnectCommand) {
Form waitForm = new Form("Waiting...");
mDisplay.setCurrent(waitForm);
Thread t = new Thread() {
public void run() {
connect();
}
};
t.start();
}
}
private void connect() {
HttpConnection hc = null;
InputStream in = null;
String url = getAppProperty("HitMIDlet.URL");
try {
hc = (HttpConnection)Connector.open(url);
in = hc.openInputStream();
int contentLength = (int)hc.getLength();
byte[] raw = new byte[contentLength];
int length = in.read(raw);
in.close();
hc.close();
// Show the response to the user.
String s = new String(raw, 0, length);
mMessageItem.setText(s);
}
catch (IOException ioe) {
mMessageItem.setText(ioe.toString());
}
mDisplay.setCurrent(mMainForm);
}
}
There are two other things to configure to get
click on Settings..., then select the User Defined tab. Click on the Add button. Fill in the property name as HitMIDlet.URL; the value should be the URL that invokes
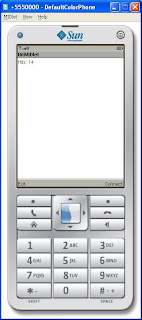
Click on Build button and then Run button to run the application. you will see the emulator now..launch and connect and u will see the same result you saw in the webbrowser earlier as shown below..
HitMIDlet working. First, you need to tell the toolkit about this new MIDlet. Click on Settings..., then select the MIDlets tab. Click on Add and fill in "HitMIDlet" for both the MIDlet name and class name. You can leave Icon blank. Click on OK and you should see HitMIDlet listed.click on Settings..., then select the User Defined tab. Click on the Add button. Fill in the property name as HitMIDlet.URL; the value should be the URL that invokes
HitServlet, the same URL you used in a browser to test the servlet. When you're finished, click on OK to dismiss the project settings window.Click on Build button and then Run button to run the application. you will see the emulator now..launch and connect and u will see the same result you saw in the webbrowser earlier as shown below..


