Before accessing a hard disk or any other storage medium in Linux or UNIX they should be mounted. Note that there is no concept of mounting in windows platforms. Mount allows you to merge two file systems. Mounting of file systems are done with mount command.
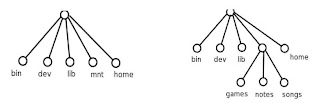
The figure shows the unix file system before mounting and after mounting.
The Mount command
Mount command has many options and hence little complex. But most of the time you will be able to mount file systems easily with few options. Mount command takes following general format.
mount -t filesystem_type -o mount_options /dev/device_file /mnt/mount_point
Usually we don't specify t option because kernel can usually identify the file system type by looking at partition table. The o options are also optional.We can unmount a device by it's device file name or by the mount point.
#umount /dev/sda
#umount /mnt/flash
Mounting a CD ROM/DVD ROM
Following command tells the kernel to auto detect (t auto) file system type and mount the device /dev/cdrom on /mnt/cdrom.
#mount -t auto /dev/cdrom /mnt/cdrom
If mounting fails, check whether you have a /mnt/cdrom directory, you can do it by using ,
#ls -l /mnt/cdrom
If it is not there then create it,
#mkdir /mnt/cdrom
Now try the mount command if it fails again check whether you have /dev/cdrom. If it does not exist, try
#dmesg | grep -i cdrom to find out the device file.
Now you can retry the command assuming that /dev/hdb is your CD ROM drive.
#mount -t auto /dev/hdb /mnt/cdrom.
Mounting a floppy, USB drive and windows partition
You can mount floppy as root user with following command.
#mount -t auto /dev/fd0 /mnt/floppy
If you get any error follow steps given earlier.
For USB drive, as root user
#mount -t vfat /dev/sda1 /mnt/usb
If you get any error follow steps given above. If you still get error saying that /dev/sda is not a valid block device then check whether the disk is partitioned. You can do this with fdisk command.
#fdisk -l /dev/sda
If you still find problems restart your hotplug sub system and remove and reinsert the device.
#/etc/init.d/hotplug restart
When mounting DOS/Windows partitions first make sure whether it is fat formated or ntfs the following commands can be used.
#mount -t vfat /dev/hda1 /mnt/windows
#mount -t ntfs /dev/hda5 /mntwinxp
If you want to mount so that all users can read and write, you may want to try:
#mount -t vfat -o user,rw,exec,umask=000 /dev/hda1 /mnt/c
“-o user,rw,exec,umask=000” gives every body all the permission to all the files on your partition.
Mounting a loopback device
Create a file containing all zeros. A 10MB file.
#dd if=/dev/zero of=myblock.img bs=1k count=1024
Now attach this to loop back device and format.
#losetup /dev/loop0 myblock.img
#mkfs -t vfat /dev/loop0
Now we can mount the device by using the file as the device.
#mount -o loop myblock.img /mnt/loop
How can you allow a normal user to mount a device?
All you have to do is adding an entry to the /etc/fstb file It has the following format.
<file> <mount> <type> <options> <dump> <pass>
/dev/sda1 /mnt/usb vfat user,rw 0 0
